Chapter 17. Authentication Configuration
When a user logs in to a Red Hat Enterprise Linux system, the username and password combination must be verified, or authenticated, as a valid and active user. Sometimes the information to verify the user is located on the local system, and other times the system defers the authentication to a user database on a remote system.
The Authentication Configuration Tool provides a graphical interface for configuring NIS, LDAP, and Hesiod to retrieve user information as well as for configuring LDAP, Kerberos, and SMB as authentication protocols.
 | Note |
|---|---|
If you configured a medium or high security level during installation or with the Security Level Configuration Tool, network authentication methods, including NIS and LDAP, are not allowed through the firewall. |
This chapter does not explain each of the different authentication types in detail. Instead, it explains how to use the Authentication Configuration Tool to configure them. For more information about the specific authentication types, refer to the Red Hat Enterprise Linux Reference Guide.
To start the graphical version of the Authentication Configuration Tool from the desktop, select the Main Menu Button (on the Panel) => System Settings => Authentication or type the command system-config-authentication at a shell prompt (for example, in an XTerm or a GNOME terminal). To start the text-based version, type the command authconfig as root at a shell prompt.
 | Important |
|---|---|
After exiting the authentication program, the changes made take effect immediately. |
17.1. User Information
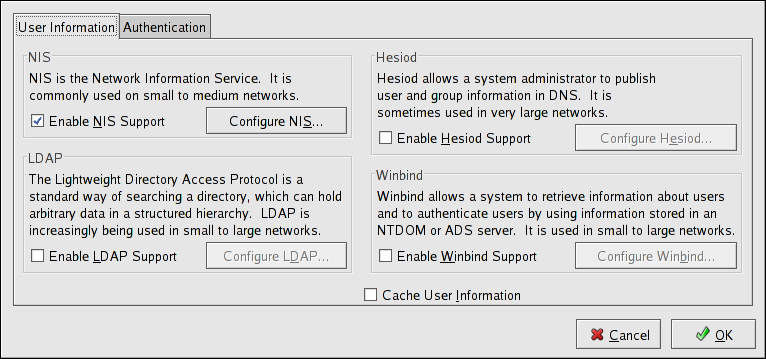
The User Information tab has several options. To enable an option, click the empty checkbox beside it. To disable an option, click the checkbox beside it to clear the checkbox. Click OK to exit the program and apply the changes.
The following list explains what each option configures:
Enable NIS Support — Select this option to configure the system as an NIS client which connects to an NIS server for user and password authentication. Click the Configure NIS button to specify the NIS domain and NIS server. If the NIS server is not specified, the daemon attempts to find it via broadcast.
The ypbind package must be installed for this option to work. If NIS support is enabled, the portmap and ypbind services are started and are also enabled to start at boot time.
Enable LDAP Support — Select this option to configure the system to retrieve user information via LDAP. Click the Configure LDAP button to specify the LDAP Search Base DN and LDAP Server. If Use TLS to encrypt connections is selected, Transport Layer Security is used to encrypt passwords sent to the LDAP server.
The openldap-clients package must be installed for this option to work.
For more information about LDAP, refer to the Red Hat Enterprise Linux Reference Guide.
Enable Hesiod Support — Select this option to configure the system to retrieve information from a remote Hesiod database, including user information.
The hesiod package must be installed.
Winbind — Select this option to configure the system to connect to a Windows Active Directory or a Windows domain controller. User information can be accessed, as well as server authentication options can be configured.
Cache User Information — Select this option to enable the name service cache daemon (nscd) and configure it to start at boot time.
The nscd package must be installed for this option to work.
